How to: Get Your Spanish Visa from the Chicago Consulate
Authored By:

Getting your visa is the biggest step to take when moving abroad. When I first started the process, I had no idea what to do. Thankfully, CIEE is a huge help. They will provide you with a visa guide that details everything you will need, and a timeline of when to get certain documents by; follow this step for step.
This blog post is from my POV as a first time visa applicant. It is meant as a supplement to accompany the visa guide to answer any additional questions you may have. Hopefully with these two things, you will get your visa easily.
How do I know which consulate to apply through?
First off, depending on where you live determines which consulate you will apply through for your visa. I am from Ohio, so I got my visa from the Chicago consulate. They also service Illinois, Indiana, Iowa, Kentucky, Kansas, Michigan, Minnesota, Missouri, Nebraska, North Dakota, South Dakota, and Wisconsin. If you are from any of these states, you will use the Chicago consulate as well.
Most of the consulates require pretty much the same documents for your application; however, they do vary a little, so make sure you strictly pay attention to your consulate and what they ask for when applying. In this How-To guide I will be going over the specific details for the Chicago consulate only.
Chicago Consulate: What do I Need?
A note on the documents before we start going over them. In the visa guide, there will be a timeline of when to get certain documents, like your background check. These expire after a certain period of time, so CIEE will give you a timeframe of when to get it so that it is valid for your visa.
The documents you really need to pay attention to are your Medical Certificate, and your background check (and your passport if you don’t already have one). Everything else can be at your own leisure. CIEE will also give you a date of when you need to mail your visa in by, so make sure you pay attention to that as well.
1. National Visa Application form
This can be found online in CIEE’s visa guide. It is about 5 pages long. Print the document out, and fill in all the necessary blanks. CIEE also has a guide on how to fill it out. This is located in the visa guide as well.
2. $160 dollar money order
I had no idea what a money order was, but it is kind of like a check. You can get one from a bank or post office. I got mine from the post office on the day I went in to mail the application itself.
3. Passport (w/ a photocopy)
You will need to mail in your passport with your application. Include a printed photocopy of the pages at the beginning with all of your info as well. To make a photocopy, I just had my mom scan my passport into a JPEG using her iphone. You can also use a digital scanner like in a printer.
4. Driver’s License
The Chicago consulate accepts visa applications by mail. Instead of mailing your actual driver’s licenses, include two photocopies of it.
5. Passport photo
You will need to include a passport sized photo, glued to the first page of the national visa application form. It doesn’t have to be the same exact photo as your passport, just passport sized. I got mine taken at Walgreens. You can take them yourselves and print it off, just make sure you get it the right size.
*Hint - you will want to print off or get a couple extra, because you will need them to get your TIE residency card when you get to Spain. When I got mine done at Walgreens, I got 4 total so I had a few for the visa and for the residency card.
6. Medical certificate
A template of this is available in the CIEE visa guide. It basically says that you have no mental or physical health conditions that prevent you from moving to and living in another country. It needs to be filled out by an MD. All other consulates, at the time of my application, accepted the signature of an MD or a DO, except Chicago. They are both doctors, just different kinds.
My doctor is a DO, and I had a hard time getting an appointment with an MD. No doctors wanted to see me for just a one time appointment, and no MDs at urgent care would fill it out. Additionally, anywhere I called had a month-long waiting list. If you are in a similar boat, what I did was use the app Zoc Doc to find somewhere that could get me in ASAP, and I became a new patient with them, and they filled it out for me.
Another important thing with the medical certificate, it needs to be stamped by the doctor’s office. Mine was stamped, but CIEE told me to get a business card to go with it to make it even more official. I then had to go all the way back to get the card. So while you are there, see if you can get a business card to attach.
Lastly, the medical certificate needs to be translated into Spanish. If you use the template provided by CIEE, there is a Spanish translation at the bottom of the page. Just make sure both sections are filled out.
7. Background check
An important note about the background check is that you need to get your fingerprints taken digitally. If you get them done on a black ink card, it takes the government a couple weeks longer to process it. My local police station didn’t have a digital fingerprint scanner, so I got mine done at a nearby UPS store.
At the end of this post, I will link the website I used to find a digital fingerprint scanner near me. You can use this website to locate and make an appointment (there are other websites CIEE recommends, but this one had lots of locations in Ohio for me).
8. Apostille of the Hague
An Apostille is basically just a seal from the government verifying the authenticity of your background check. Once you get your background check back, you should send it to get Apostilled right away! CIEE will have a step by step guide about how to do this in their Visa guide.
Your Apostille will be mailed back to you. It will come attached to your background check. DO NOT take out the staple connecting the two, otherwise it won’t be valid anymore and you will need to get it Apostilled…again.
Your background check and apostille will need to be translated as well. I got mine translated through the website Rush Translate. You just upload scans of your documents and an official translator sends them back to you in Spanish. I included both a Spanish and English copy of both in my application. The link to Rush Translate can be found at the bottom of this post.
9. Digital letter of acceptance
This can be found on your Aux Madrid portal. After you accept your school placement, you will get an email to make an account on Aux Madrid. It will be located on this website labeled “Carta de Nombramiento.” Download this and print off a copy to include with your application.
10. Prepaid, USPS priority express self-addressed return envelope
When you mail in your visa application, include an envelope with your address and pre-paid postage. The consulate will use this envelope to mail back extra papers, and a paper with information to track the process of your visa. Once you receive this in the mail, open it and use the tracking number and website so you can know when it’s ready to be picked up.
11. Signed disclaimer form
This can be found in the visa guide. Just print it off, fill it out, and include it with your application.
12. Contact paper
There is no template for this. I just opened a google doc and put my full name, email, phone number, and best time of day to contact me, then printed it off and included it with all my other papers. The consulate never contacted me about my visa, this is just in case they need to.
Sending In & Picking up Your Visa
In 2022, the Chicago consulate allowed people to mail in their visa applications instead of making in-person appointments like they used to. This made applying for my visa much easier, because I could just go to my local post office and mail everything in instead of going all the way to Chicago just for an hour appointment.
While I was allowed to mail my visa in, I still had to go and pick it up in person. To pick your visa up in person, there are specific times and dates the consulate will give you to do this. For example, mine was on Tuesdays - Thursdays from 10 am - 12 pm. The hours might change every year, so make sure you check yours. They are located on the paper you received in the mail about how to track the progress of your visa. To pick it up, you will just need to show your driver’s license.
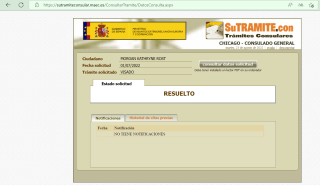
To track the progress of your visa, they will direct you to a website where you type in your tracking number. Everything will be in Spanish, but know that when the progress of your visa says RESULTO, it is ready to be picked up!
When I got my visa, I stayed in a hostel for one night. The next morning I went to the consulate right at 10 am. I included a picture of what the building looks like. It doesn’t say anything about the consulate on the outside, so I was very confused. Just walk in and go to the 15th floor, that is where the consulate is.

You do NOT need an appointment to go to the consulate. If the doorman tries to stop you because you don’t have an appointment, don’t let him. Have him call up to the consulate and tell them you are picking up your visa, and they will let you up.
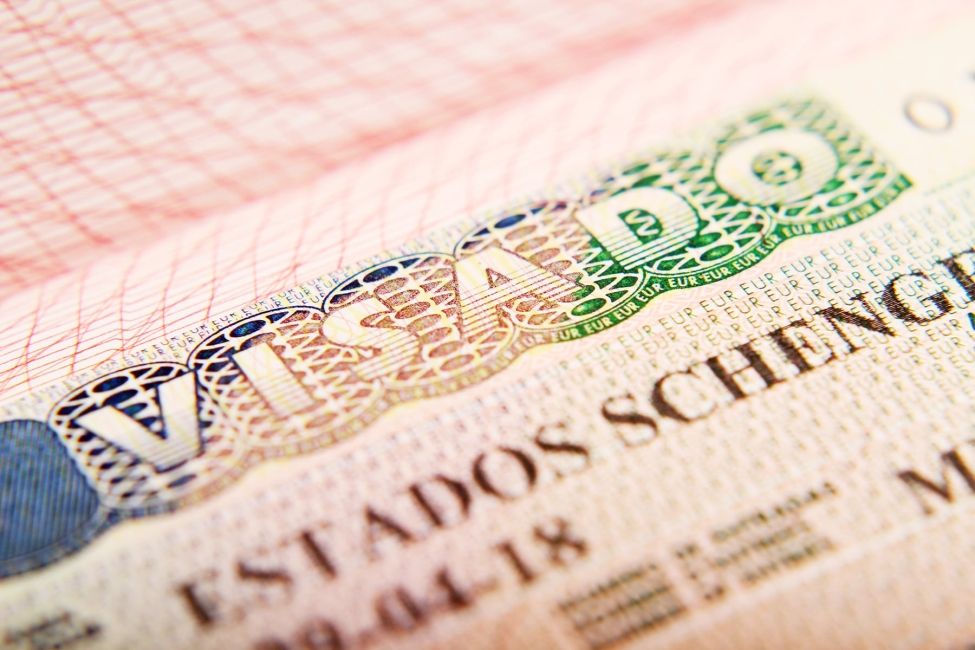
When you finally get your visa, it will just be like a giant sticker that they put in your passport that will take up a whole page. Now that you have your visa, take a breath! Getting mine was like a huge weight lifted off my shoulders. Now that you have it, you can start booking a flight! Buena suerte!
Digital Fingerprint Scanner: https://www.applicantservices.com/fbi-channeler/departmental-order-556-73/
Rush Translate: https://rushtranslate.com
**Everything in this blog post is current as of 8/22/2022. Over time they may change requirements and such, so make sure to check relevance with these things. CIEE can help with that. USE THEIR VISA GUIDE!
Related Posts

Learning Spanish by Osmosis
A short list of tips on how I, a non-expert, am going about learning Spanish without actually sitting down to study.
2026-2027 Teach Abroad in Spain is Cancelled...What to do Next and Exploring Other Options
Unsure of what to do next? Here's a started guide to alternatives you can explore.
Moving to Madrid From The U.S: Surviving Language Fatigue
It’s Friday morning. Not a cloud in the sky. After weeks of rain, everyone’s in a good mood. The teachers’ room is loud— laughter, fast conversations, plans for the weekend... keep reading